Hi friends!!
Please check out my recipes from now on at flirtinwithflavor.com :)
Website designed by elh Design
Monday, April 9, 2012
Wednesday, April 4, 2012
A Quick and Creamy Noodle Side Dish

I use this as a my super-quick side when I'm trying to eat healthy but serving others who can't get past not having a starch or carb on their plate. It takes literally 10 minutes, and is easy to squeeze in during baking or grilling time. Not to mention, the ingredients are all things I typically have some variation of on hand. You could substitute milk for cream, and other types of cheeses for parmesan for this quick whip-up. If you wanted a super-quick (albeit unhealthy...) as a main dish, double the servings and add your favorite meats and veggies!
Ingredients: - makes 2 sides, 262.5 cals each
- 1.5 c egg noodles
1 tbsp butter
2 tsp shredded parmesan
less than 1/4 c cream
S & P
1. Boil the egg noodles and drain.
2. Return pot to burner with the heat off and place butter in. Top with noodles, cheese, and add cream a little at a time while stirring until reaching desired consistency.
Season with salt and pepper.
Creamy Spinach-Stuffed Chicken Breasts with a Balsamic Bell Pepper & Mozzarella Salad

I've started to use Sparkpeople.com as a source to calculate calories in my recipes, so hopefully this new addition will be appreciated! I use the website more as a calculator than a place to display my recipes, so if you find yourself comparing my recipes on Sparkpeople to this blog, you may find those ones incomplete.
I wanted to make a healthy but filling supper for those nights when I don't even get home to start cooking until 7 or 8 at night. I had intended to grill, but the spinach mixture was a little bit messier than I had intended! I ended up baking it instead, but next time, I'll make the filling ahead of time and refrigerate it so I can try it out on the grill. The low-fat cream cheese is a bit runnier in consistency than regular, so I might even freeze it for a half hour before working with it. Anyhow, baking time took about 45 minutes, so the whole process took about an hour last night, but I imagine with grilling it would be faster. If grilling, I might opt for the top rack and place some tin foil underneath to catch and filling that may melt out.
I wanted to make a healthy but filling supper for those nights when I don't even get home to start cooking until 7 or 8 at night. I had intended to grill, but the spinach mixture was a little bit messier than I had intended! I ended up baking it instead, but next time, I'll make the filling ahead of time and refrigerate it so I can try it out on the grill. The low-fat cream cheese is a bit runnier in consistency than regular, so I might even freeze it for a half hour before working with it. Anyhow, baking time took about 45 minutes, so the whole process took about an hour last night, but I imagine with grilling it would be faster. If grilling, I might opt for the top rack and place some tin foil underneath to catch and filling that may melt out.
CREAMY SPINACH-STUFFED CHICKEN - makes 4 servings, 293.3 cals each
*Preheat oven to 400 degrees.
Ingredients:
3 c fresh spinach
4 oz low-fat cream cheese
1/4 c shredded cheddar
1 sweet onion
1 clove garlic
S&P
EVOO
4 chicken breasts, pounded thin (you can buy "trimmed and ready" by Tyson if you hate the process)
Instructions:
1. Chop your onion and garlic, and saute the garlic first in 1-2 tsp of EVOO on medium-high heat for 1 minute, then add your onions and saute until translucent.

2. Add your spinach and slowly mix and turn until wilted.

3. Remove from heat. Add cream cheese and cheese and stir until well combined. Season with salt and pepper. As I mentioned earlier, I would recommend making this ahead of time so it can get a bit solidified and easier to work with.

4. Put a generous dollop of the spinach mixture on each chicken breast and wrap breast ends over top. Secure with a toothpick. Spoon remaming spinach mixture over the wrapped chicken breasts in a greased oven-safe dish.


5. Bake for 45 minutes on 400 degrees or until a meat thermometer reads 165 degrees.
CLICK HERE FOR NUTRITION FACTS
_______________________________________________________________________________
BALSAMIC BELL PEPPER & MOZZARELLA SALAD - makes 4 servings, 174.9 cals each

3 bell peppers (I used red, green, and orange)
fresh mozzarella (about 4-6 oz)
S & P
1 tsp balsamic vinegar
1 tbsp dijon or spicy mustard 1 tsp sugar
Directions:
Thinly slice the bell peppers, and roughly chop the mozzarella. Season generously with sea salt and ground black pepper and refrigerate until ready to dress.

When ready to dress, whist together the bottom 4 ingredients and toss with the salad. YUMMY!
Monday, March 26, 2012
Grilled Asparagus

This is a super-easy and healthy side dish when you're grilling out. Subsitute grilled asparagus for potato chips at your typcial BBQ - you still get the crunchiness and the saltiness, but on a healthier vehicle. YUM!
serves 2-3
Ingredients:
1 bunch aspargus per
1-2 tbsp EVOO
1 tbsp balsamic vinegar
Sea salt & Pepper
Juice of 1 lemon
Instructions:
Combine all ingredients in a covered baking dish or large ziploc bag. Shake to coat.
After the grill has heated up, place asparagus spears perpindicular to the grill grates so they don't get stuck in between. Flip after about 7 minutes. Let grill for another 7 minutes and serve hot. You can grate some lemon zest or parmesan on top if you want to be fancy!
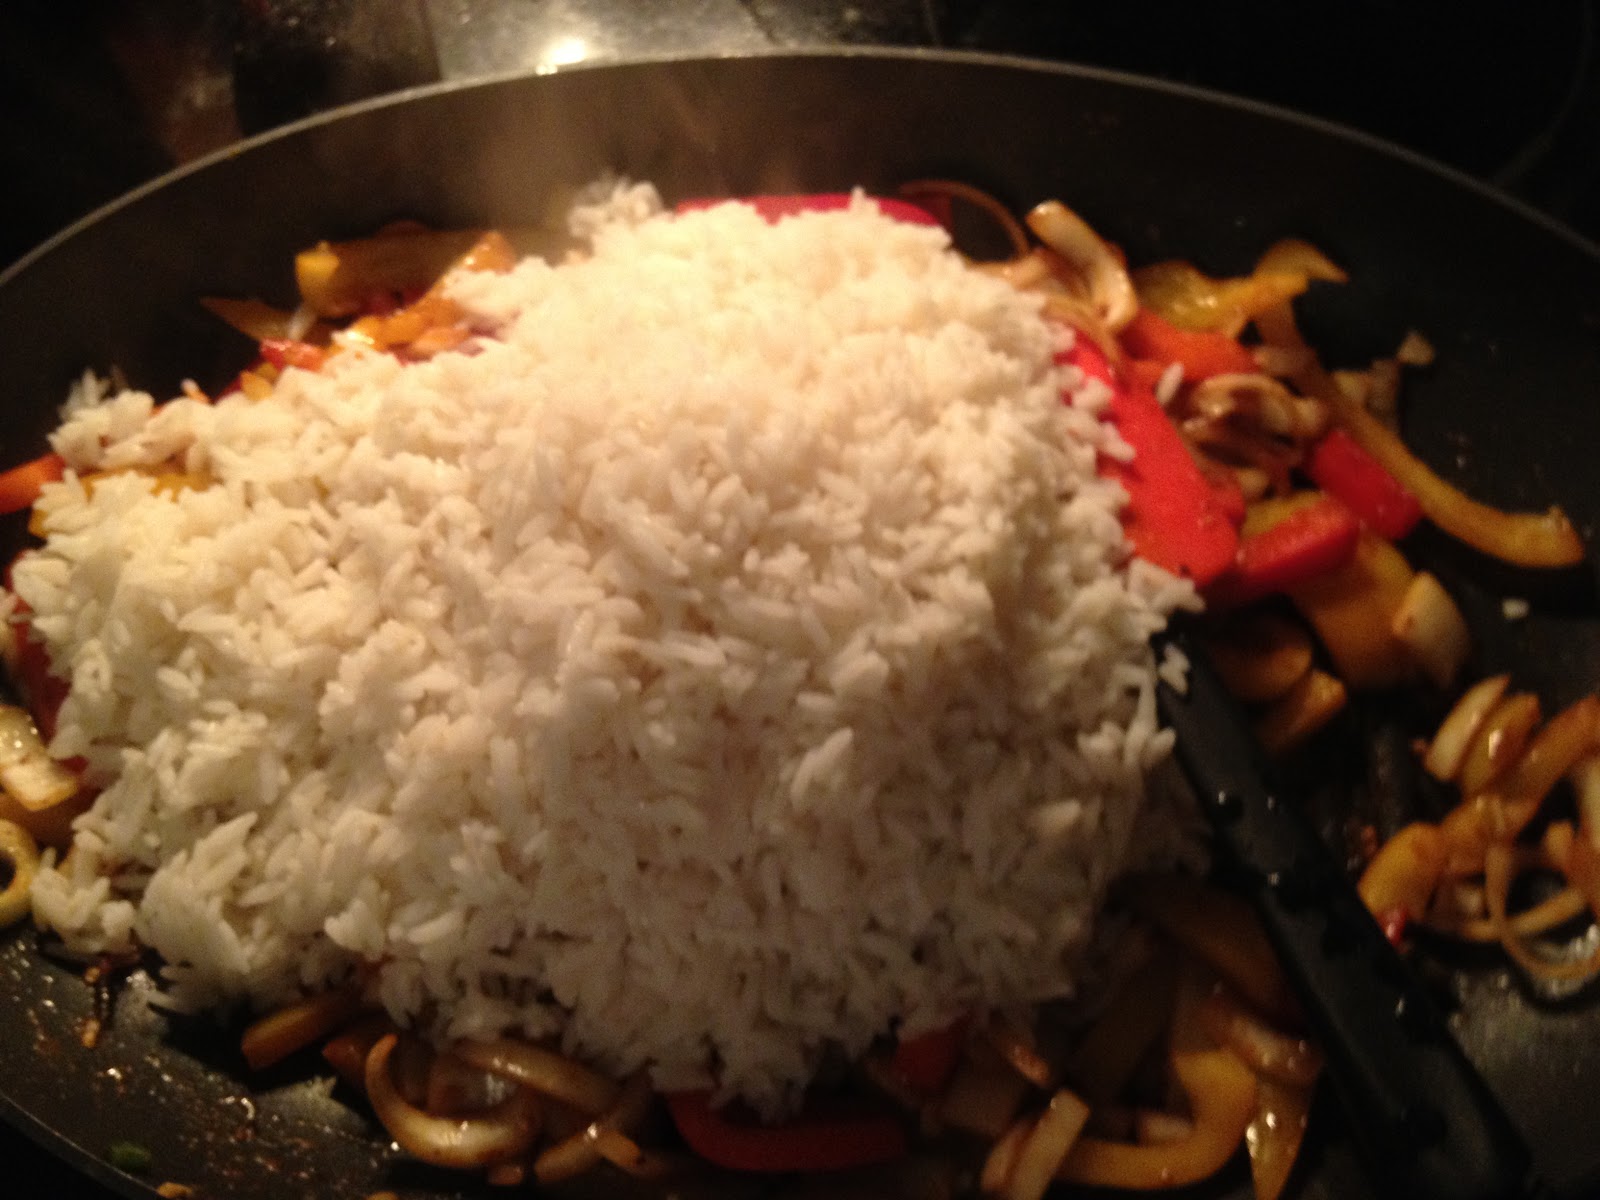
Mex-Asian Marinated Flank Steak and Rice

This recipe started as steak fajitas on the grill, but the weather wasn't cooperating. Since the marinade I had used was a little bit Asian-infused, I decided to go with a fusion themed creation that would keep me out of the rain while cooking. This was a relatively cost-effective dish, and flank steak leftovers are great for all kinds of lunches (sandwiches, wraps, over salad...). I LOVED the marinade for the steak, and still want to try it on the grill sometime soon.
Ingredients:
flank steak
Uncle Ben's "Boil-in-a-bag" rice - 2 bags
3/4 c soy sauce
1/2 c EVOO
S&P
1/4-1/3 c fajita seasoning (I use Ortega) - divided in half
1-2 bell peppers
1-2 bell peppers
1 jalapeno
1 onion
1 garlic clove
1 tbsp butter
Directions:
About a day ahead of time:
Get your flank steak marinating in the soy sauce, EVOO, 1/2 of the fajita seasoning, and S&P in an oven-safe baking dish. I usually dump everything on top of the steak and then turn several times to coat. I think I did this Thursday morning and cooked Friday night. Just make sure it is tightly covered in the refrigerator, and remove about 45 minutes before you're ready to cook so it can reach room temperature.

1. Preheat your oven to 450 degrees, and make sure your meat has time to get to room temperature out of the refrigerator.
2. Boil about 6 cups of water for your rice (use the instructions on the box). I use 2 bags for this recipe.
3. Get a large grill or saute pan heated up over medium-high heat. Turn your steak to coat again while waiting. Once hot, place your flank steak on the hot pan (if hot enough, there should be a sizzle). Cook about 3-4 minutes per side until just browned, return to the baking dish in the remaining marinade. Plop into the oven while you finish off the rice.

4. Chop your garlic, onion, jalapeno, and bell peppers. Melt 1 tbsp butter in the same pan used for the steak over medium to medium-high heat. Dump your veggies in and get them all coated in the juices and butter.

5. Drain your rice and add to the veggies. Add the remaining fajita seasoning, S&P, and continue to toss in the pan over heat.
6. Remove your steak and check on it (I would check on it about 10 minutes after putting into the oven).
7. When steak has reached desired done-ness, transfer to a cutting board and slice against the grain.

8. Pour the juices from the baking dish over the rice, remove from heat, and mix well.

9. Serve your steak over rice, and garnish with a jalapeno slice! You can add cheese and maybe even sour cream too, if you want to sway the dish back towards the mexican side.
Wednesday, March 14, 2012
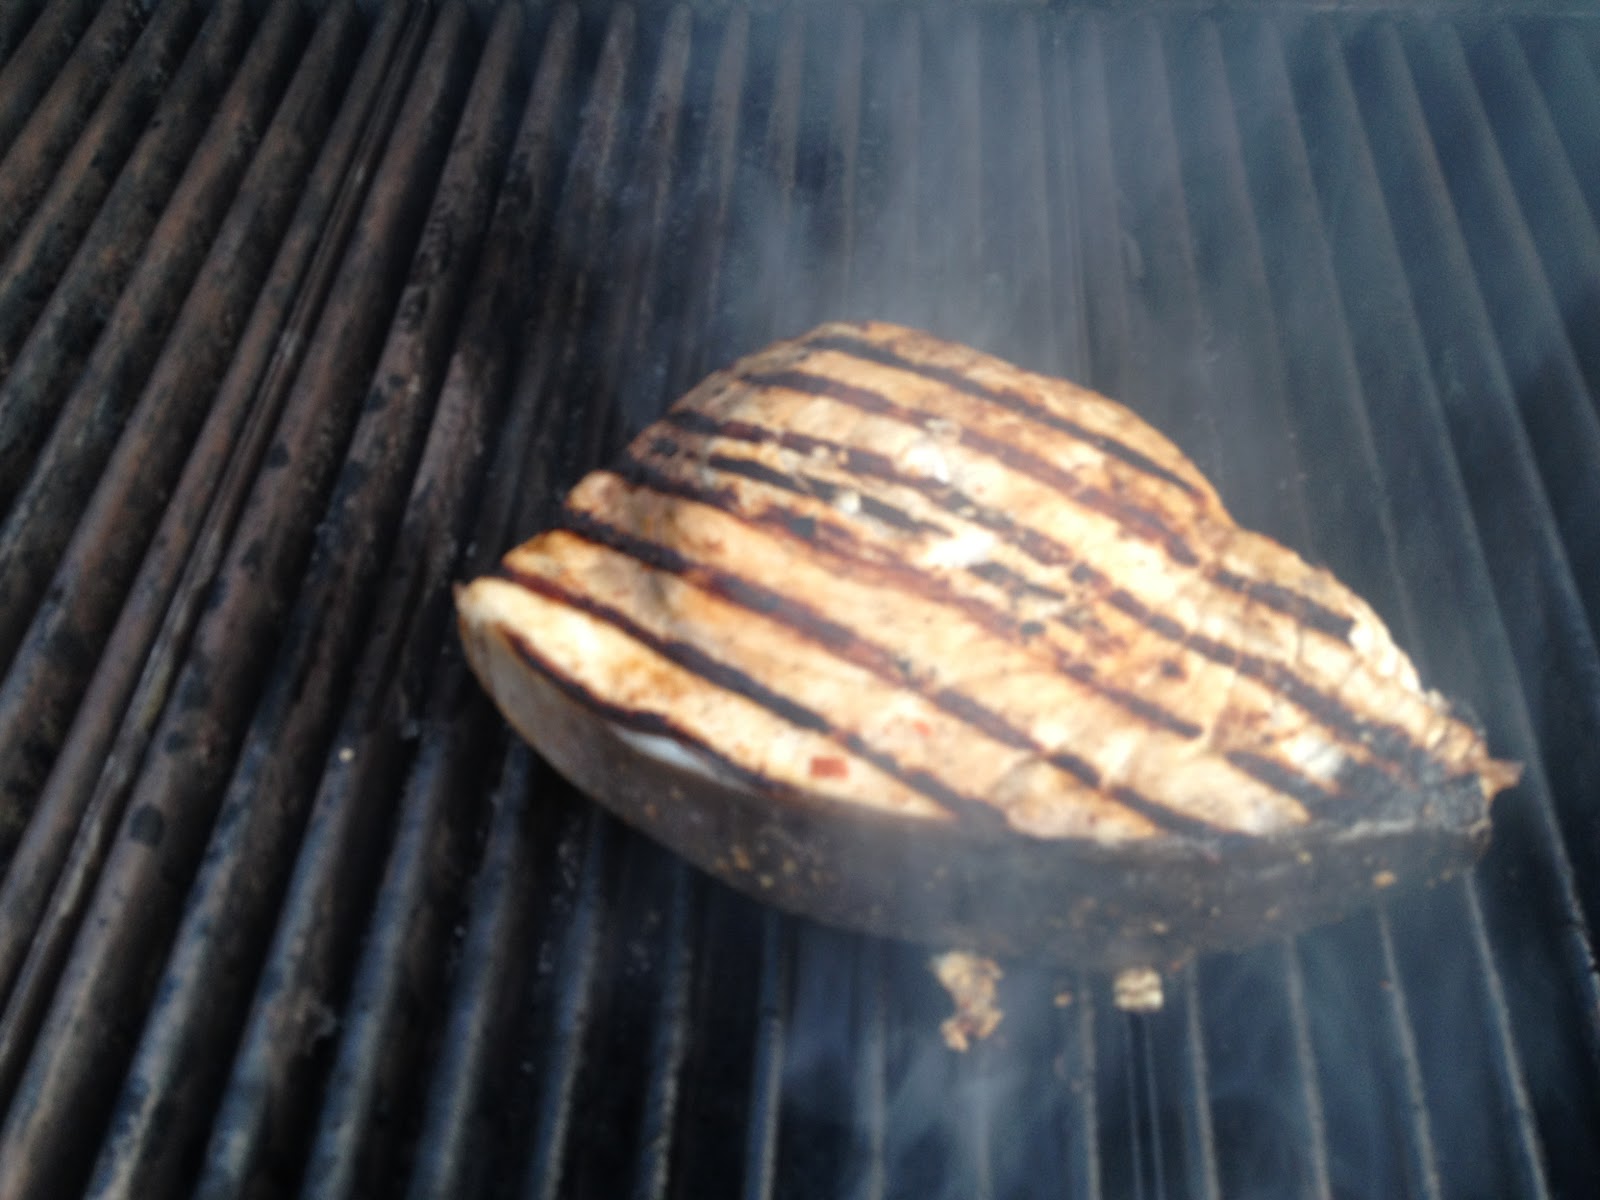
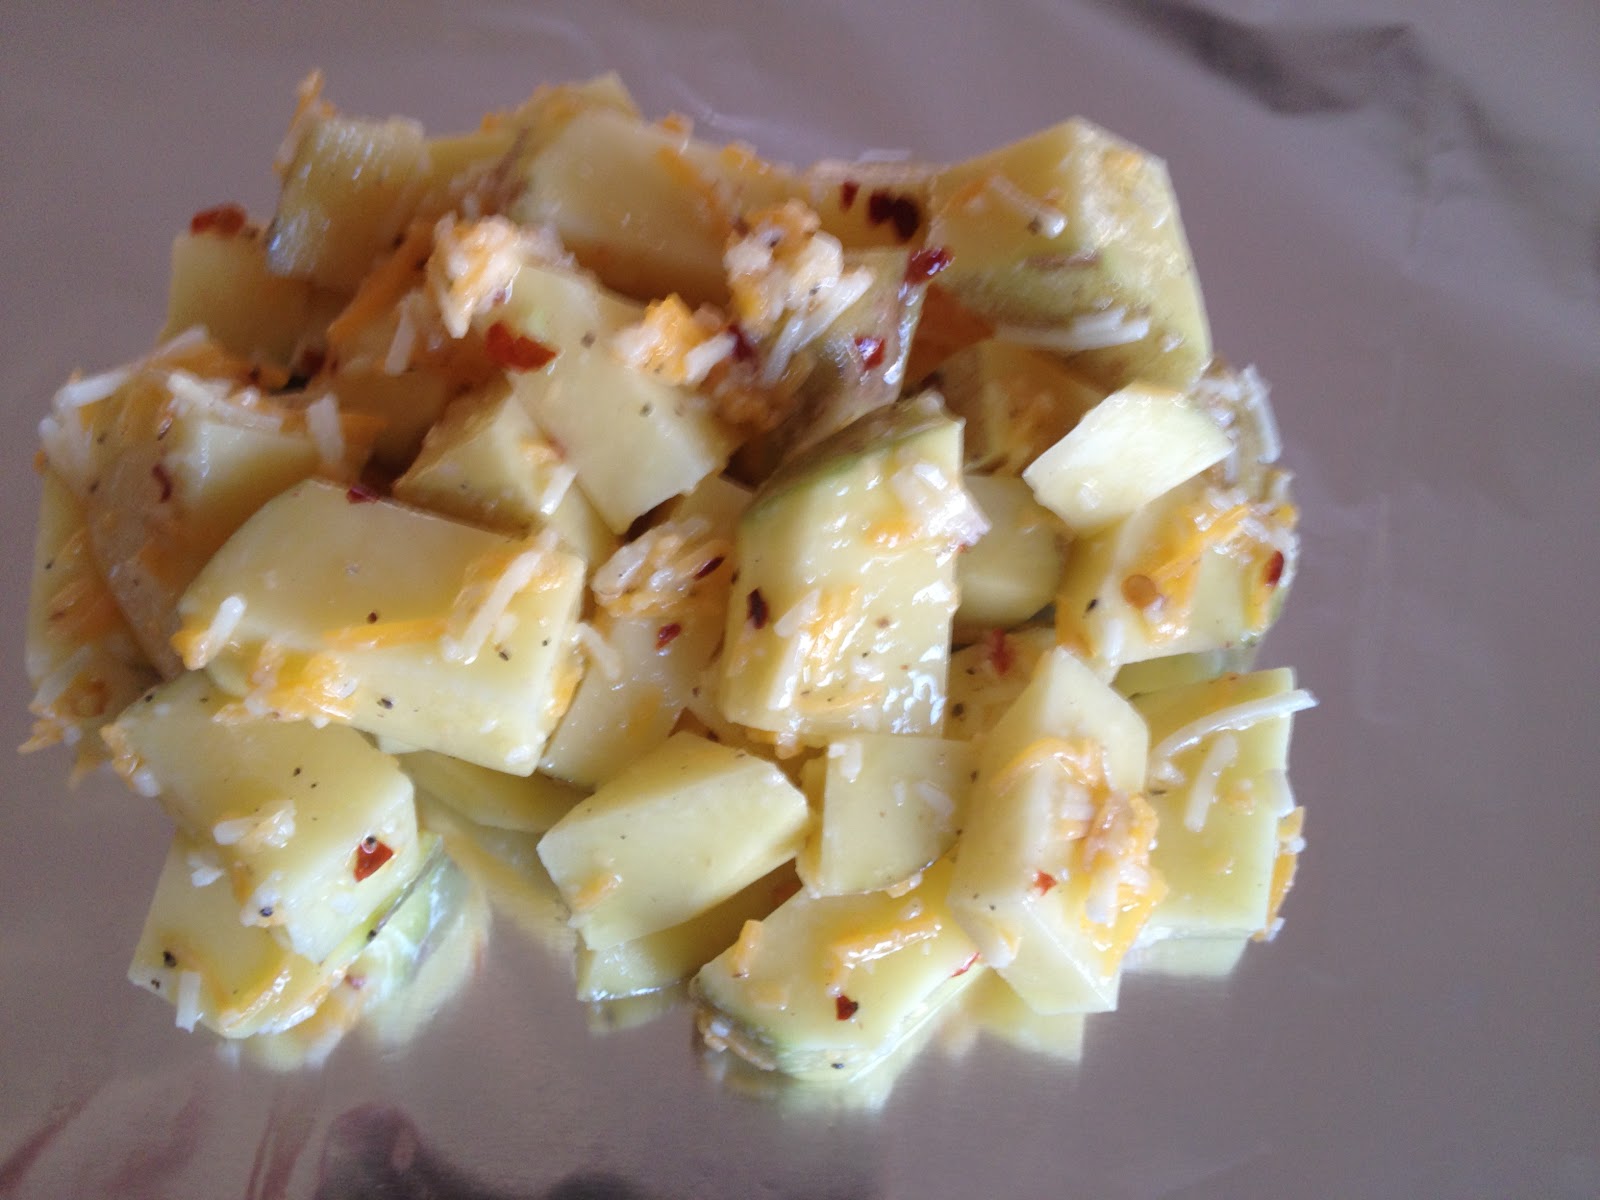
Grilled Swordfish, Chili-Garlic Shrimp Kabobs and Cheesey Tin Taters

This week is just too beautiful to be relegated inside at the stove, so I used the opportunity to make my first kabobs of the year and try grilling my first swordfish EVER! My two guests and I were all impressed, so I thought I'd share with you! This recipe was the perfect amount for 3 people, leaving us thoroughly stuffed after a pretty healthy dinner (as long as you don't overdo the drawn butter dipping!). I've adjusted the recipe here to feed 4, as that seems like a more frequent serving size. I would definitely recommend eating outside though, as the peel-n-eat factor in the shrimp can be quite messy, but makes for a much more flavorful and moist product than using peeled shrimp. I've separated out the recipes by item, but if you recreate the whole meal, I would recommend first getting your swordfish and shrimp in their marinades and returning to the fridge until ready to grill, and getting your potatoes on the grill at least 30 minutes before serving time on the top rack but not more than an hour.
*You will need PAM Olive Oil Spray (or your favorite EVOO mister/non-stick cooking spray) for all 3 dishes
For the Swordfish, You Will Need...
2 lbs swordfish steak 1" thick - look for the little strip of dark meat to have some red in it, all brown=bad
4 tbsp EVOO
1 tbsp worcestershire sauce
1 tsp lemon juice
2 tsp spicy mustard
S & P
Serve with a remoulade sauce or cucumber-dill salsa!
Directions:
1. Whisk together the bottom 5 ingredients and get your swordfish marinating in there. Return to fridge if you aren't putting on the grill yet. I would remove about 10 minutes before grilling. The fish shouldn't be marinated any long than an hour or two in a covered dish.
 2. Make sure you're grill is on Med High heat and fired up at least a few minutes prior to grilling. Spray your grill grate with non-stick cooking spray and place your swordfish on there. For 4 pre-cut, 1" servings, grill about 5 minutes per side. A good rule of thumb with swordfish is about 10 minutes cooking time per inch of thickness (5 min per side), so adjust as needed. This number may increase the larger the surface area as well. I had about a 1.5 lb piece uncut, and it took closer to 17 minutes to cook fully. You want it to cut easily with a fork and be white throughout.


*Tip: spray the grill again as you flip to avoid sticking.
*Tip: The meat closest to the skin and spot of dark meat are the most tender and yummy, although I have to admit, I'm still turned of by actually eating the dark meat!
Serve with a remoulade sauce or cucumber-dill salsa!
Directions:
1. Whisk together the bottom 5 ingredients and get your swordfish marinating in there. Return to fridge if you aren't putting on the grill yet. I would remove about 10 minutes before grilling. The fish shouldn't be marinated any long than an hour or two in a covered dish.


*Tip: spray the grill again as you flip to avoid sticking.
*Tip: The meat closest to the skin and spot of dark meat are the most tender and yummy, although I have to admit, I'm still turned of by actually eating the dark meat!
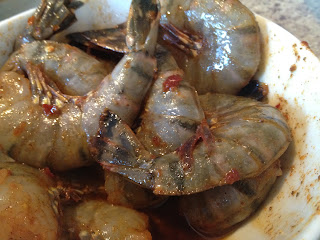
For the Shrimp, You Will Need...
16 Tiger shrimp, deveined, but peels-in-tact (a little more than 1 lb, depending on size)
1 tbsp EVOO
1/2 tsp lime juice
1 tbsp Old Bay seasoning
1 tsp chili garlic sauce (Sriracha makes a great one, small jar, lime-green top)
S & P
1/2 tsp cayenne pepper
1/2 tsp paprika
2 large bell peppers (I used chunks of bell pepper)
Skewers
1 stick butter, sea salt, and 2 tsp Old Bay seasoning for drawn butter (optional)
Directions:
1. Whisk together bottom 7 ingredients (not the butter, etc.) in a large bowl. This marinade will be a little more paste-like than the swordfish marinade.
2. Toss in your unpeeled shrimp until all pieces are well coated. Use a spatula for this - the shells and legs can be sharp, and a spatula is gentle enough to keep them in tact. Stick back in the fridge until you're ready to make your kabobs. These can be marinated in a sealed bag or container up to a day ahead of time. If within a couple hours of grill time, just covered in the fridge is fine.
 3. When ready to make kabobs, chop up your bell peppers into easy-to-skewer pieces and remove your shrimp from the fridge. Spray with EVOO mister (or toss in EVOO) with sea salt and ground black pepper.
 4. Alternate your veggies and shrimp (about 4 per skewer) for pretty kabobs!
*Tip: If you're using wooden skewers, submerge in cold water a few minutes prior to threading your shrimp and veggies to keep the skewer from charring and breaking.
 5. Spray grill with nonstick cooking spray and and grill on Med High for about 3 minutes per side. You'll know it's time to flip when the shells become marbled with a pinkish-white hue.
 6. If serving with "drawn" butter: Chop up your butter and place into a glass measuring cup with pourer, Melt in the microwave (about 1 minute). Mix in your sea salt and Old Bay seasoning and pour into ramekins for each person.
7. Serve your kabobs! These should be eaten the same as peel-n-eat shrimp. Google if you've never tried this - and SHAME on you!


2 large bell peppers (I used chunks of bell pepper)
Skewers
1 stick butter, sea salt, and 2 tsp Old Bay seasoning for drawn butter (optional)
Directions:
1. Whisk together bottom 7 ingredients (not the butter, etc.) in a large bowl. This marinade will be a little more paste-like than the swordfish marinade.
2. Toss in your unpeeled shrimp until all pieces are well coated. Use a spatula for this - the shells and legs can be sharp, and a spatula is gentle enough to keep them in tact. Stick back in the fridge until you're ready to make your kabobs. These can be marinated in a sealed bag or container up to a day ahead of time. If within a couple hours of grill time, just covered in the fridge is fine.


*Tip: If you're using wooden skewers, submerge in cold water a few minutes prior to threading your shrimp and veggies to keep the skewer from charring and breaking.


7. Serve your kabobs! These should be eaten the same as peel-n-eat shrimp. Google if you've never tried this - and SHAME on you!


For the Cheesy Tin Taters, You Will Need....
1.5-2 lbs yukon gold potatoes, rinsed and diced with skins on
1.5 tbsp butter, melted
3/4 c shredded cheese
2 tsp crushed red pepper
S & P
tin foil (1 sq foot piece per person)
Directions:
1. Mix together top 5 ingredients.
 2. Spray pieces of tin foil with nonstick cooking spray on one side. Divide potato mixture among the pieces of foil.
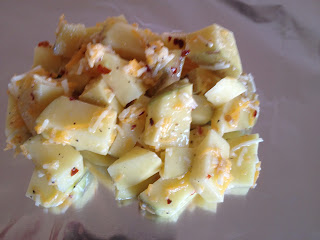 3. Fold up tightly into packets and place on grill. I like to put the packets on the top rack, where you would put things to melt cheese or keep buns warm for a steaming effect.
4. Leave undisturbed about 30 minutes - longer is okay too, but not more than an hour. Serve 1 packet per person when it's time to eat!

1.5-2 lbs yukon gold potatoes, rinsed and diced with skins on
1.5 tbsp butter, melted
3/4 c shredded cheese
2 tsp crushed red pepper
S & P
tin foil (1 sq foot piece per person)
Directions:
1. Mix together top 5 ingredients.

4. Leave undisturbed about 30 minutes - longer is okay too, but not more than an hour. Serve 1 packet per person when it's time to eat!

Tuesday, March 13, 2012
Bell of the Bowl! A Whimsical Dish...
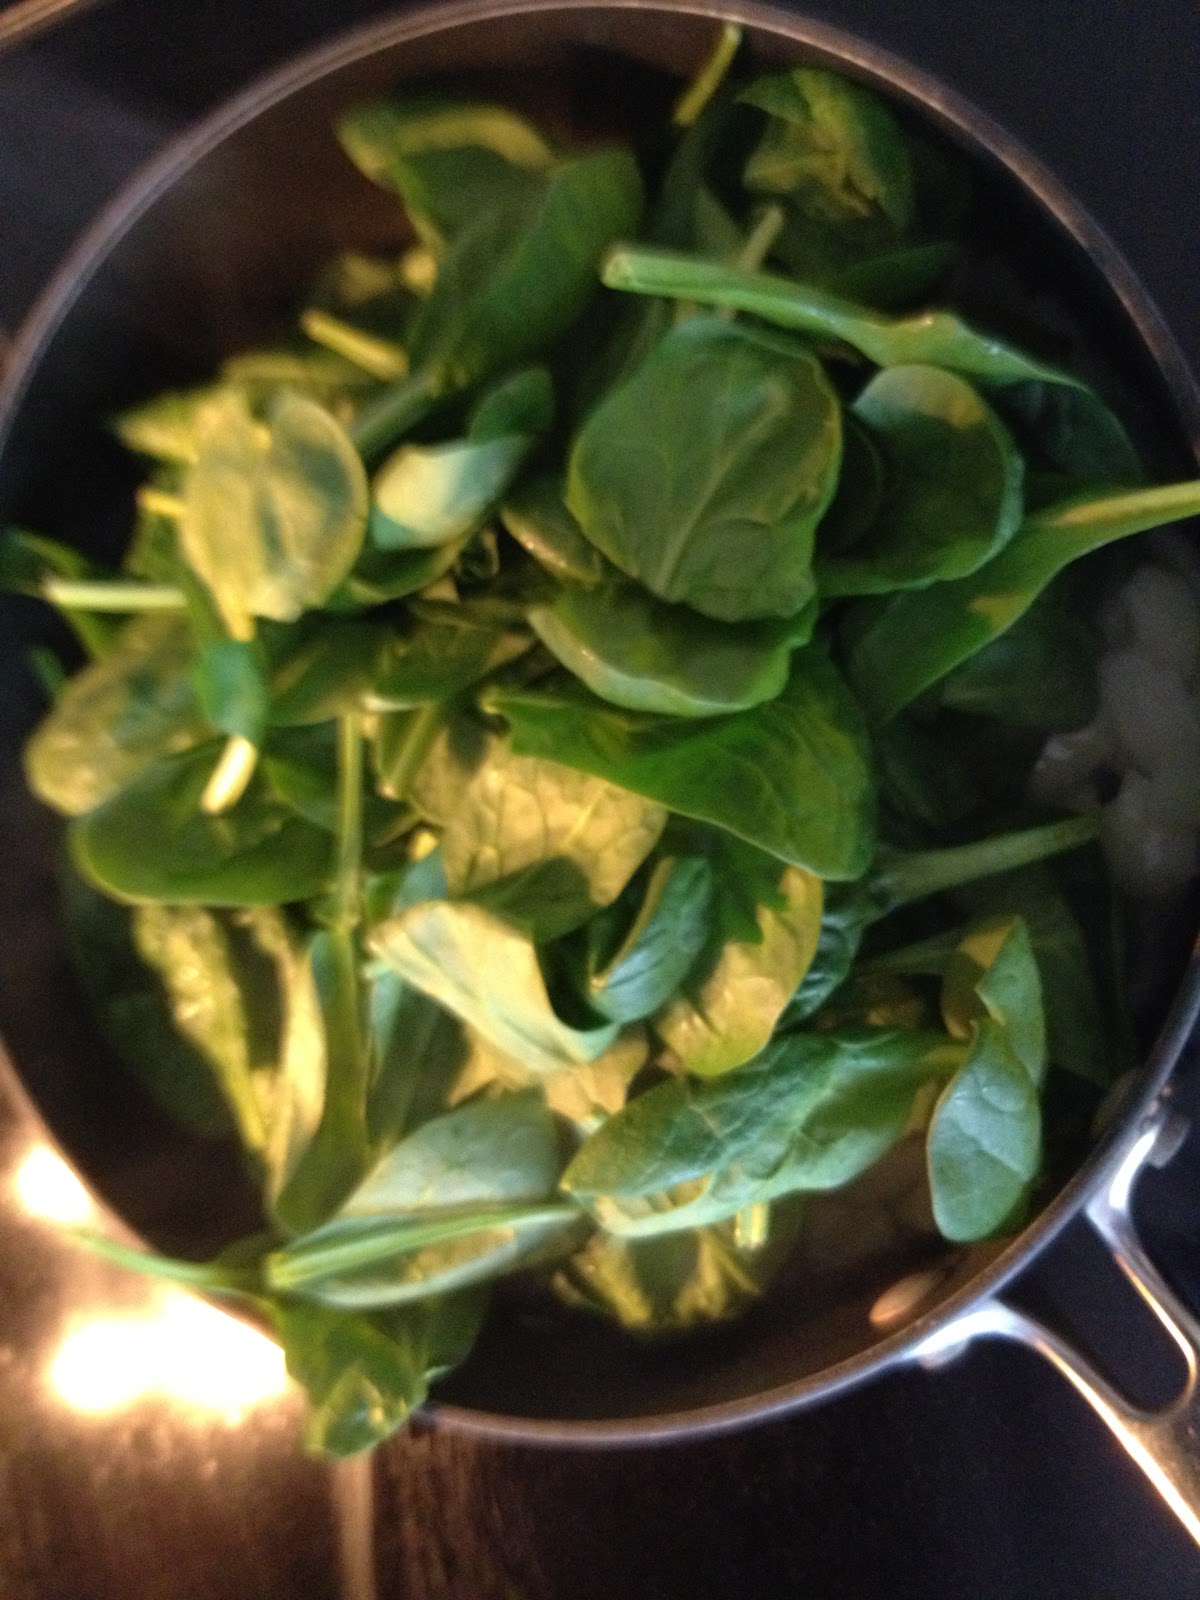
Roasted Bell Peppers topped with Sauteed Chicken and Spinach (and Goat Cheese!)

This is a whimsical dish I came up with last night when I just wanted something light I could cook for myself pretty quickly. It turned out even tastier than I could have hoped for! Partially inspired by my Aunt Nancy's recent reminder on how delicious roasted bell peppers can be with just a hint of EVOO and sea salt, I decided to incorporate those into my "whimsical dish." I also had some chicken breast, goat cheese, and spinach that wasn't otherwise spoken for, and this is what transpired! This is by far my favorite recipe so far that utilizes no butter and no cream!
serves 1 - multiply per person
Ingredients:
1 chicken breast
2 handfuls of fresh spinach
2 bell peppers
just enough goat cheese to decorate the top
1 heaping tsp Steak seasoning (I use Kroger brand Grill Time, Montreal Steak is fine too)
- if you don't have any handy,use finely minced garlic or garlic salt/poweder and add extra salt and pepper
1 tsp worcestershire sauce
1 tsp spicy mustard (my favorite brand is Sanwich Pals Hot & Spicy)
sea salt
black pepper
1-2 tbsp EVOO
olive oil mister (like PAM olive oil - you can just brush EVOO if you don't have a mister or spray)
Directions:
Preheat oven to 425 degrees.
1. Line a baking sheet with tin foil or parchment paper and spray or brush with EVOO
2. Finely chop your bell peppers lengthwise. Arrange in a single layer on the baking sheet and spray or brush the peppers. Coat generously with sea salt and black pepper. Put in your preheated oven to roast while you finish the rest. (You can use whatever colors you have around).

3. Heat up your 1-2 tablespoons of olive oil. You want just enough to cover the bottom of the pan. WHile heating, slice up your chicken breast into small pieces that truly are bite size. I like to get a little of everything on my fork for each bite, and keeping your chicken pieces small allow for that, as well as speeding up your cooking time.
4. Place your sliced chicken into the pan. We're going to do all the flavoring right there in the pan. Sprinkle on a little sea salt and move the chicken around to coat. Next add your steak seasoning, mustard, and worcestershire. Give it a good toss in the pan. Keep moving around until evenly cooked. (This shouldn't take more than 7-8 minutes if you're using small pieces).

5. Just as the chicken is getting a a golden coating and about cooked through, take those peppers out of the oven and set aside. Now it's time to wilt the spinach. Add your handfuls of spinach to the pan with the chicken still in it. Remember, spinach cooks down significantly, so overestimate the amount you'll need. Wilting it in the same pan as the chicken allows the cooking liquid to be absorbed and maintain those flavors throughout the dish. The wilting process should only take a minute, literally. Keep stirring to wet and wilt all spinach.

Now just top with a pinch of goat cheese and serve!
** Some other suggestions for this dish would be to serve it over rice, or use teriyaki instead of worcestershire. You could also improvise with whatever veggies you have in your fridge! Or if you are not a goat cheese fan, skip it! It was still healthy and delicious.

Subscribe to:
Comments (Atom)